

Following up on my previous comparison of cross-platform trade copiers, here is the step-by-step practical setup guide for TradersConnect.
The setup I am currently using is straightforward: Manual trading on BlackBull (cTrader) ➡️ Auto-copying to FTMO (cTrader).
Here is the exact setup process—from linking accounts and configuring balance-proportional lot sizing (Balance Multiplier) to symbol mapping for indices like the Nasdaq.
Step 1: Connect Two Accounts (BlackBull & FTMO)
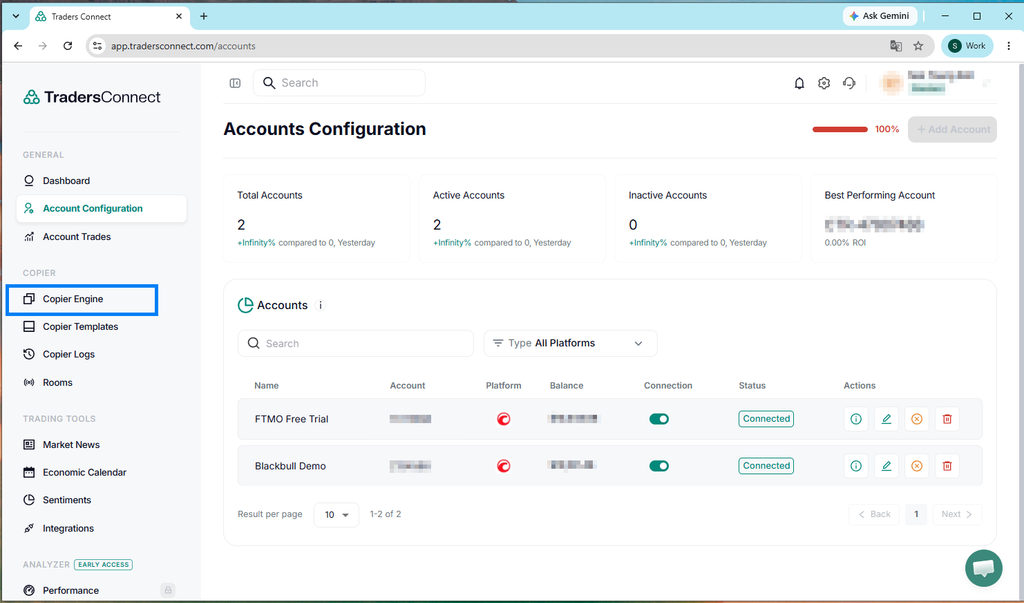
- Click on Account Configuration under the GENERAL section in the left sidebar menu.

- Click the Add Account (or Connect Account) button in the top right corner.

- Select your trading platform. (In my case, it’s cTrader; choose whichever platform you use).
- For cTrader, you don’t select broker-specific servers manually. Instead, it redirects to the official Spotware cTrader ID (cTID) authentication page.
- Log in with your cTrader credentials (email/password) and approve permissions. Once authorized, all linked accounts under your cTID (both your BlackBull and FTMO accounts) will appear.
- Make sure to enable and add both accounts.

- Wait, I added cTrader, but nothing shows up? Simply click Add Account again.

- A popup will reappear. Select cTrader again, and the configuration fields will show up.Note: The numbers under cTrader Profiles represent your unique cTrader ID (cTID) profile number (think of it as a master user ID), not individual trading account numbers. You can ignore it for now.Fill out the cTrader Account fields below:
- Name *: Enter an identifiable nickname (e.g.,
BlackBull DemoorProvider). - Account * (Dropdown): Click
Choose account. You’ll see your authorized trading accounts. Select your BlackBull account and click Add Account at the bottom. - Register the Second Account: Click + Add Account again. Name it
FTMO LiveorCopier, pick your FTMO account number from the dropdown, and click Add Account

- Name *: Enter an identifiable nickname (e.g.,
- Once both accounts are registered, you’ll see the usage meter hit 100%, and the Add Account button will be disabled. (This is because TradersConnect charges per account seat—e.g., $10/month per account. Since I paid for 2 accounts, 2 is the maximum for this tutorial).Verify that both accounts appear in the list under Accounts.

Step 2: Create a Copier Template
If you trade prop firms, manage multiple manual accounts, or plan to deploy algorithmic trading bots later, managing settings across individual copiers becomes tedious. TradersConnect allows you to save predefined risk and execution rules as templates.
- Navigate to Copier Templates and click Add Template.

- Enter a Template Name. Use something clear. Since I manually trade on BlackBull and forward signals to FTMO, I named mine:
BlackBull to FTMO 1:1 (Indices)
- Click Risk Settings to configure how lot sizes are calculated.

Overview of Risk Type Options:
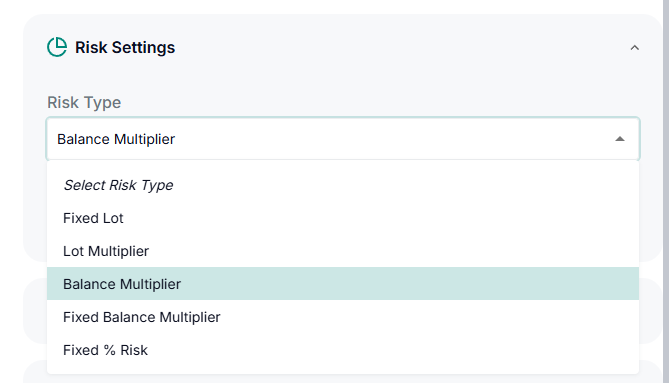
- Fixed Lot: Copies orders at a predetermined fixed lot size (e.g., 0.1 lots), regardless of the master account’s lot size.
- Lot Multiplier: Multiplies the master’s lot size by a fixed factor (e.g., 2.0x means 1 lot on BlackBull becomes 2 lots on FTMO).
- Balance Multiplier (Dynamic Balance Ratio):Automatically calculates the lot size based on the real-time balance ratio between both accounts.
- Fixed Balance Multiplier: Locks the balance ratio at the time of configuration instead of updating dynamically.
- Fixed % Risk: Calculates lot size inversely from the master’s Stop Loss (SL pips) so the slave risks a fixed percentage of its equity (e.g., 1%).
My choice: Since I want the position size to scale proportionally with each account’s current capital, I selected Balance Multiplier.
Setting the Multiplier Value:
- 100 (%): Exactly 1:1 balance-proportional scaling. (e.g., $5,000 vs. $10,000 replicates 2x relative risk perfectly).
- 50 (%): Halves the calculated lot size for conservative copying.
- 200 (%): Doubles the calculated lot size for aggressive copying.I set mine to 100.
- Click SL and TP Settings:

Check the top three boxes and leave the rest at default (No).- Copy Stop Loss (Check ☑️): Copies the master’s SL to the copier account. Essential for prop firm risk rules.
- Copy Take Profit (Check ☑️): Copies the master’s TP.
- Copy Pending Orders (Check ☑️ or optional): Copies limit/stop orders (Buy Limit, Sell Stop, etc.). Keep checked if you use pending orders.
- Other options: Leave
Fixed Stop Loss / Take ProfitandRefinementset to No (defaults).
- Click Advanced Settings:

Keep default checkboxes and values as follows:- Force Minimum Lot Size (Keep Checked ☑️): Prevents orders from being rejected if calculated lots fall below the broker’s minimum requirement (e.g., 0.01).
- Force Maximum Lot Size (Unchecked): Not needed unless hitting broker maximum lot limits (typically 100+ lots).
- Reverse Trade (Do NOT Check ❌): Inverts buy/sell trades. Leave unchecked.
- Contract Alignment (Keep Checked ☑️): Automatically adjusts sizing when brokers have differing contract sizes on indices.
- Copy Expiry Time (Keep Checked ☑️): Copies expiration times on pending orders.
- Strict Close (Unchecked): Keep off to avoid hanging retries during volatile closes.
- Comment / Magic Number / Delay: Keep defaults (
No,No trade delay,0).
- Configure Trade Filters:

This section filters which orders should be copied or ignored. If copying all manual trades from BlackBull, leave everything at default:- Filter by magic number: None (copies all).
- Filter by comment: Blank.
- Trade Side:
Copy All trades. - Filter by lot size:
No.
- Click Add Copier Template to save and verify it in your templates list


Step 3: Configure Copier Engine & Symbol Mapping
1. Open the Copier Engine
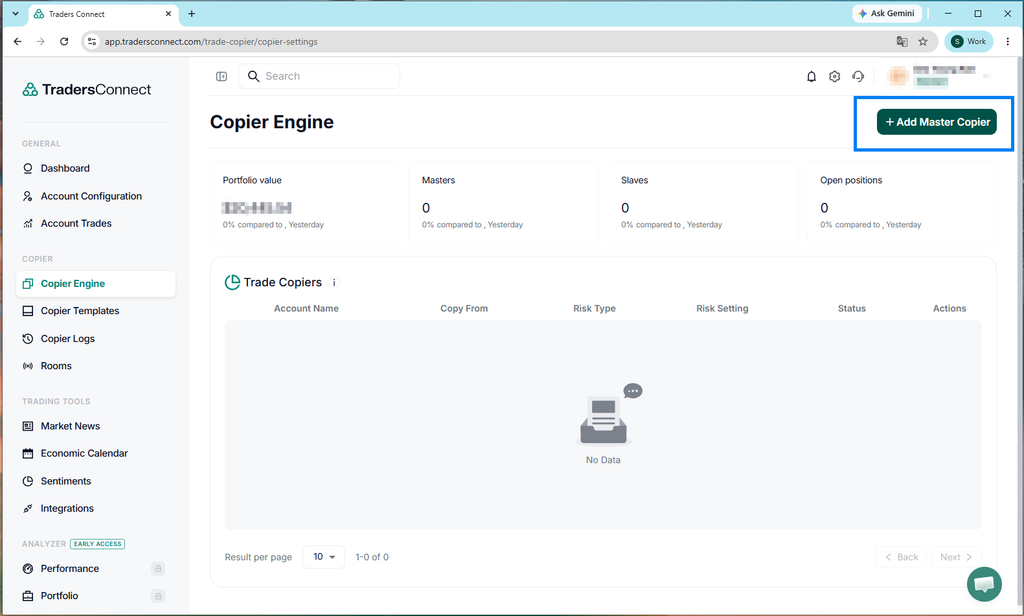
Go to COPIER ➡️ Copier Engine
in the sidebar menu and click the green + Add Master Copier button.
2. Assign Accounts & Template
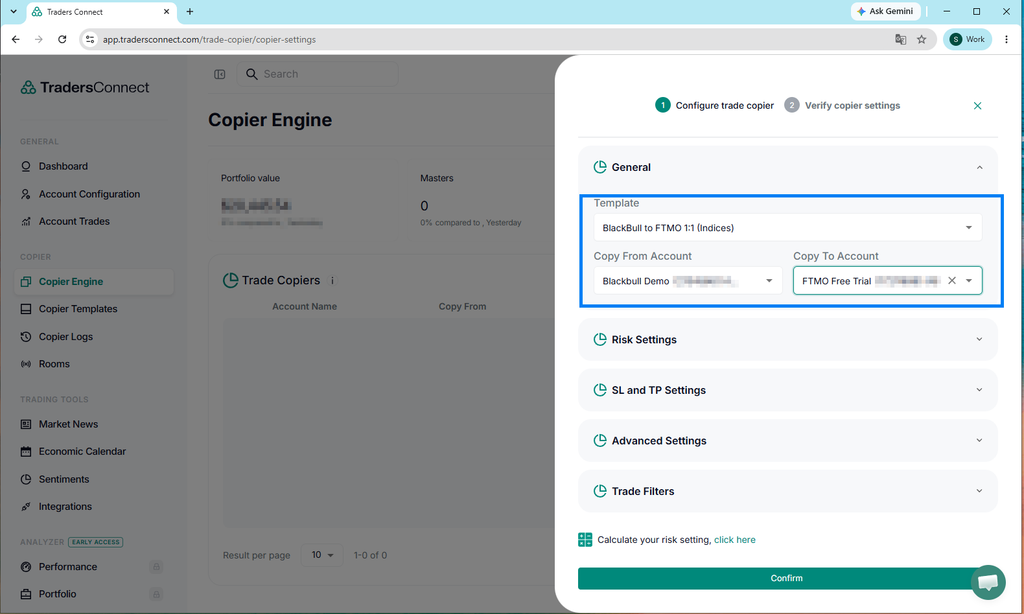
In the configuration modal:
- Template: Select the template created in Step 2 (
BlackBull to FTMO 1:1 (Indices)). All risk and filter settings will auto-populate. - Copy From Account:
BlackBull Demo(Master / Signal Provider). - Copy To Account:
FTMO Free Trial(Slave / Receiver).
3. Configure Symbol Mapping
- On the second row for FTMO Free Trial (SLAVE), click the orange Symbol Mapping button.

- Review mapped vs. unmapped symbols:

- TradersConnect automatically maps around 88 standard forex pairs out of the box.
- Left column (Unmapped Symbols): Instruments not yet paired.
- Right column (Mapped Symbols): Currently paired instruments.
- Search for your preferred instruments using the filter bar. If your instrument differs across brokers (e.g., Nasdaq), map it manually from the unmapped list.
Step 4: Save & Real-Time Execution Test
Once symbol mapping is saved, the Status toggle turns green—meaning the copier is live and listening for executions.
Testing Execution:
Open your desktop cTrader application, go to your BlackBull Demo account, and open a test order with minimum lot size (e.g., 0.1 lots).
I primarily trade the Nasdaq 100. Because BlackBull labels it NAS100 while FTMO labels it US100.cash, this test also verifies that symbol mapping is working flawlessly.
Pre-Flight Checklist:
- Partial Close: When closing half a position on the master (e.g., 0.2 out of 0.4 lots), verify that the slave reduces volume by exactly 50%.
- Dynamic SL/TP Modification: Modify your SL or TP on the master chart; verify the slave’s SL/TP adjusts instantly.
- Pending Orders & Cancellations: Place a Buy Limit below market price on the master. Verify it appears on the slave, and confirm it deletes cleanly when cancelled on the master.
- Close All: Close multiple open positions at once to ensure no orphaned trades remain on the slave.
- Log Verification: Go to Copier Logs in the left menu to inspect execution speed (latency in milliseconds) and execution logs in real time.