
!!! Read the previous post first
[How to Pass Prop Firm Challenges by Copying Your Own Manual Trades: Compliance & Copy Trading Overview]
(※ If you’re not yet familiar with prop firm copy trading rules or the core principle of linking accounts under your own name, make sure to read the previous post first!)
*※ Note: Copiix is a solid choice if your primary trading assets are Crypto, Forex, or Gold/Silver. However, Copiix copy trading does not work reliably for Indices and Commodities (such as Crude Oil). In those cases, paid alternatives like Duplikium or Traders Connect provide a reliable workaround. I’ll cover those solutions in another post.
“So, what software do I actually install, and how do I connect it?”
In the previous post, we talked about how passing prop firm challenges isn’t about following external signal channels, but about replicating your own manual trades directly into your prop accounts.
After publishing that post, I received quite a few messages saying, “I understand the concept, but what tool should I actually use?” and “It sounds way too complicated to set up.”
Fair point. Usually, when people think of copy trading, they imagine installing obscure programs, keeping their PC running 24/7, and renting overseas VPS servers—a headache before you even take a single trade.
So this time, we’re skipping all the bloat. Here is the step-by-step setup guide for Copiix, which requires no complicated installers and takes about 10 minutes directly on your machine.
The moment you click buy or sell on your master account, the prop account mirrors it in the blink of an eye. Leave the complexity behind and just follow along!
* Author’s test environment: This tutorial was written using the setup below. However, the basic process remains identical even if you use different terminals, CFD brokers, or prop firms. Just keep in mind that ticker symbols may vary depending on your specific broker and prop firm combinations.
- Terminal: cTrader, MT5
- Broker: BlackBull Markets
- Prop Firm: FTMO
* Linking BlackBull or FTMO to cTrader can be done directly from each platform’s user dashboard.
* Note: FTMO only allows you to change your trading platform (cTrader, MT4/MT5, etc.) before you take your very first trade or immediately after a payout. For more details, refer to this link.
1. Why Choose ‘Copiix’ Over Other Copy Trading Tools?
Most traditional copy trading tools rely on clunky EAs/cBots (automated modules for MT5 and cTrader) with settings menus that induce headaches, or cloud-based solutions routed through remote web servers that introduce execution latency. When scalping or day trading manually, that split-second lag leads to slippage—and slippage turns profits into losses.
Copiix operates on a local copy architecture that routes signals directly between platforms on your local PC (or VPS), maximizing both execution speed and reliability.
- Ultra-Fast Execution Without External Servers: Signals travel directly between local application windows without detouring through third-party web servers, virtually eliminating latency and slippage.
- Cross-Platform Compatibility: Seamlessly mirror trades across different platforms, including MT4, MT5, and cTrader.
- Clean, Minimalist UI: No complex code tweaking or confusing parameters. The interface makes designating Master/Slave accounts and setting lot multipliers straightforward.
- Prop Firm–Optimized Features: Built-in safeguards—such as hiding order comments—keep you fully compliant with prop firm detection algorithms.
In short, it minimizes setup friction while offering the lowest possible latency, making it ideal for copying manual entries straight into prop accounts.
2. 3 Things You Need Before Getting Started
Have these three items ready before starting the setup:
- Copiix Program Files: The downloaded executable and your activation key from the official source.
- Master Account (Signal Provider): The trading terminal window (MT4, MT5, cTrader, etc.) logged into your personal broker account where you execute manual trades.
- Slave Account (Signal Receiver): The trading terminal window logged into your prop firm account (FTMO, etc.) where orders will be replicated.
(※ Tip: This doesn’t run like a typical SaaS web app where you register an account and log in online. Instead, you launch both your Master and Slave terminal windows on your PC and use the Copiix app to bridge them locally!)
In this tutorial, we will use the following environment. The workflow is largely the same for other setups, aside from minor differences (e.g., Copiix terminal connection hooks or symbol naming discrepancies like NAS100 vs. BTCUSD):
- Terminal: cTrader
- Master Account: BlackBull Markets (CFD Platform)
- Slave Account: FTMO (CFD-based Prop Firm)
3. Step-by-Step Copiix Setup in 5 Steps
Step 1: Download & Run Copiix
(a) Copiix can be downloaded directly from its website without registering an account. It runs as a standalone local executable that requires no traditional installer.
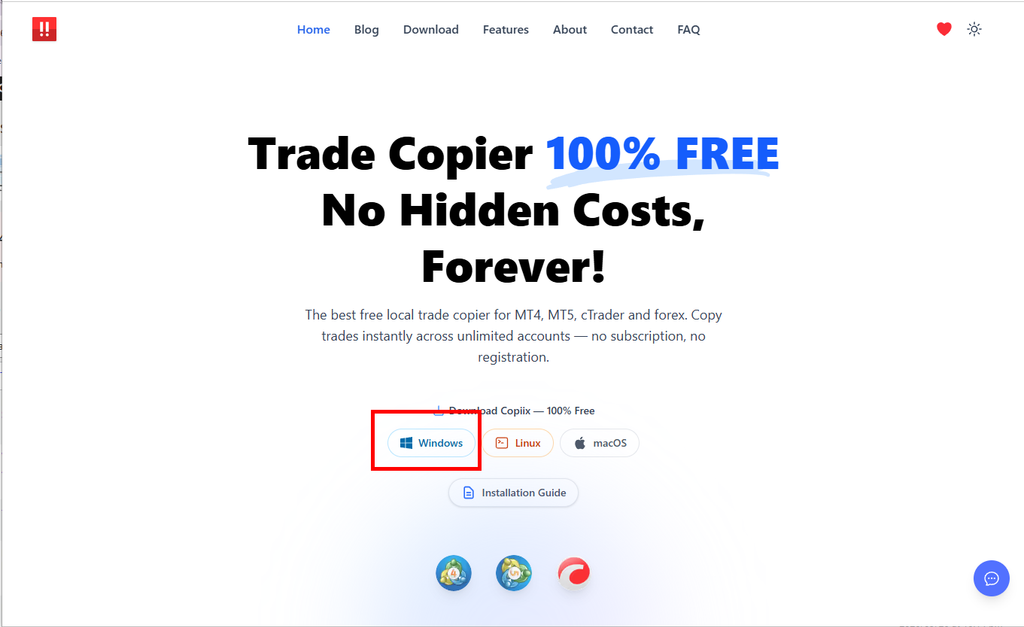
(b) Once downloaded, extract the ZIP archive. No additional installation is needed. Move the extracted folder to a convenient location, such as your Desktop.

(c) Open the folder and run the executable file (Copiix-3.exe).
(d) If a blue Windows SmartScreen popup appears, click “More info”.
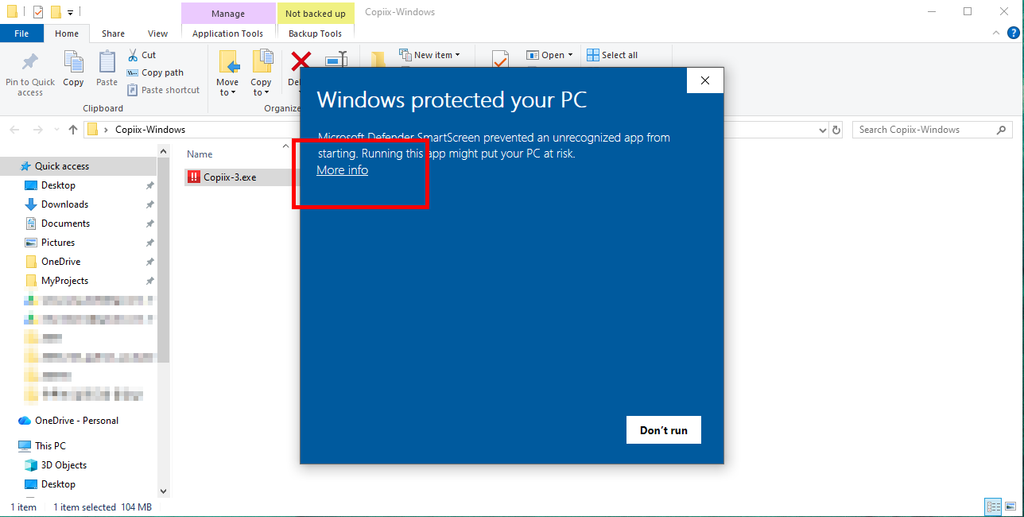
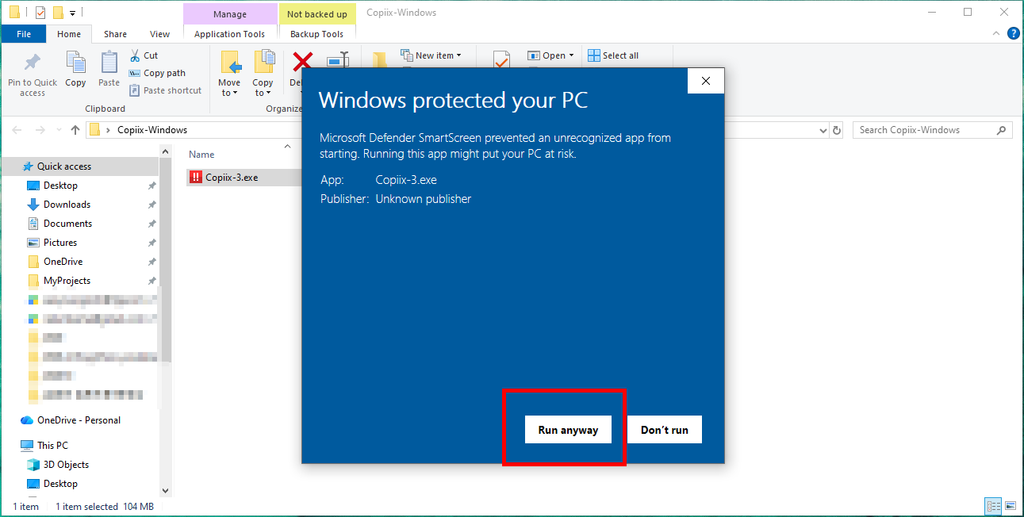
(e) Click the “Run anyway” button to launch Copiix.
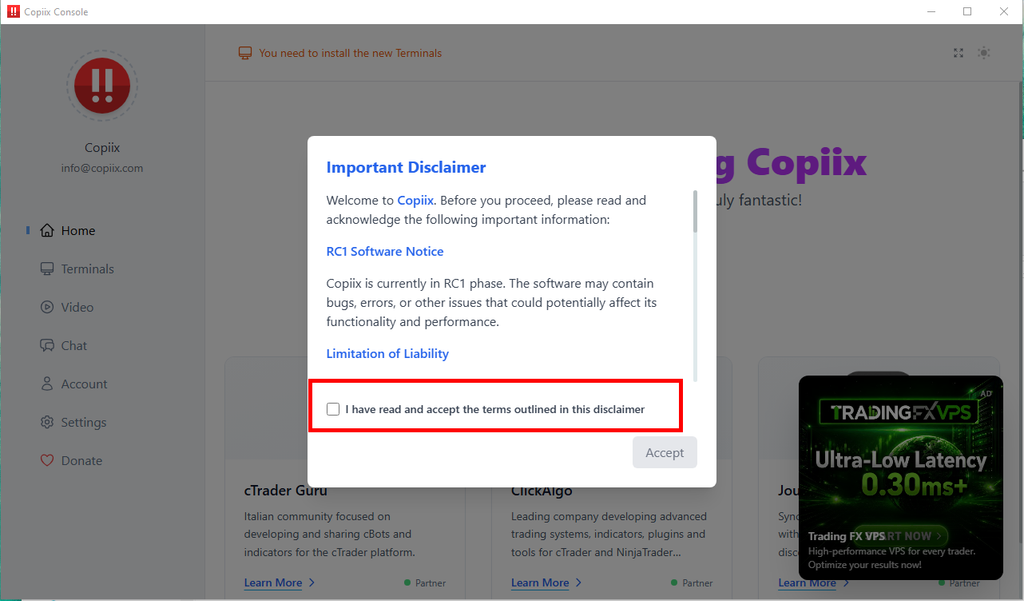
(f) Once the app opens, tick the confirmation checkbox and click “Accept”.
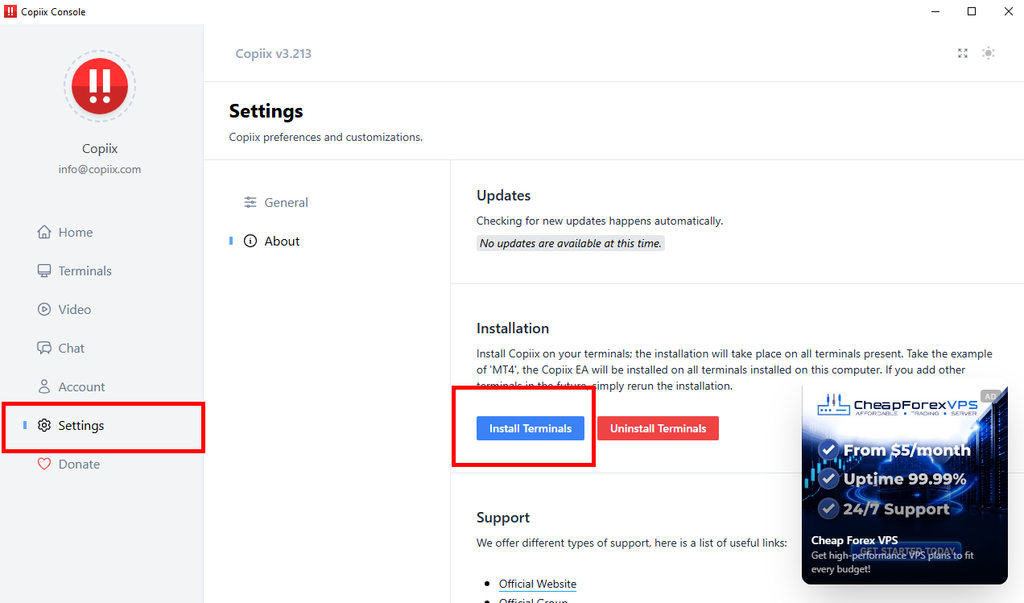
(g) Navigate to the Settings menu and click “Install Terminals” under the Installation section. This allows terminals like cTrader and MT4/MT5 to detect Copiix.
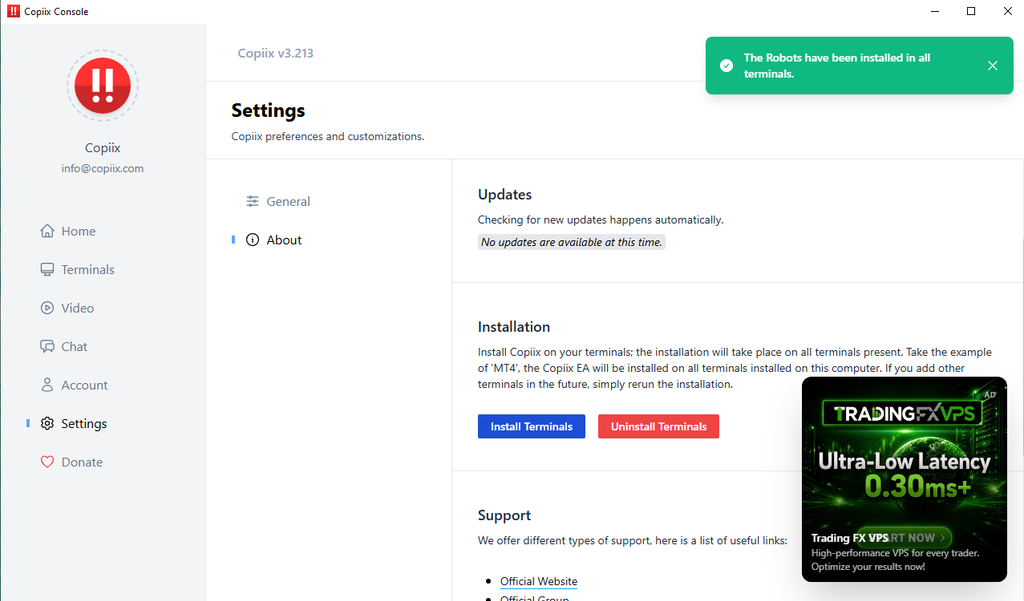
Once clicked, a green confirmation popup will appear indicating success.
Step 2: Verify Copiix Inside Your Terminal (cTrader)
(a) Launch cTrader and click the hamburger menu (three horizontal lines) in the top-left corner.
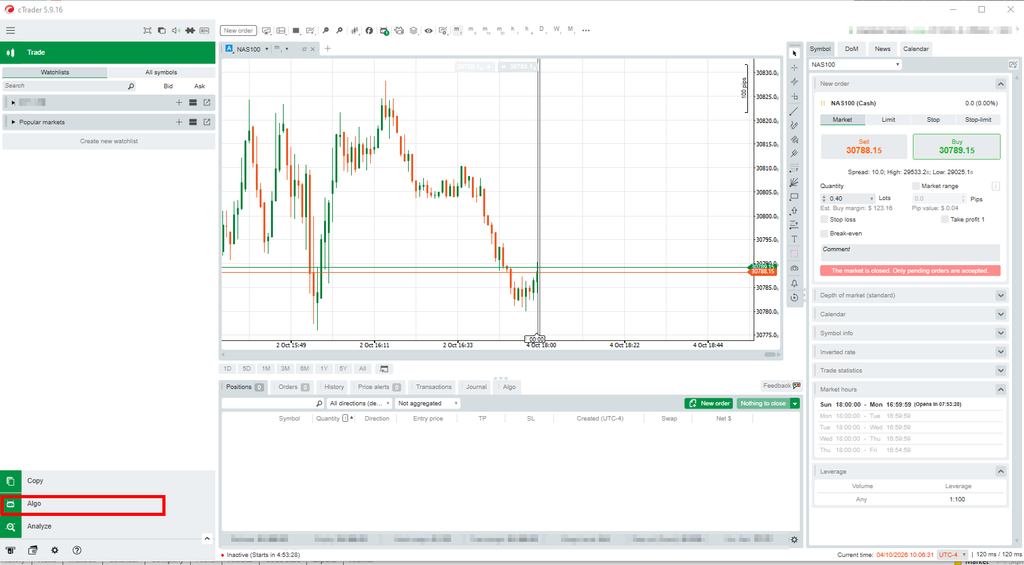
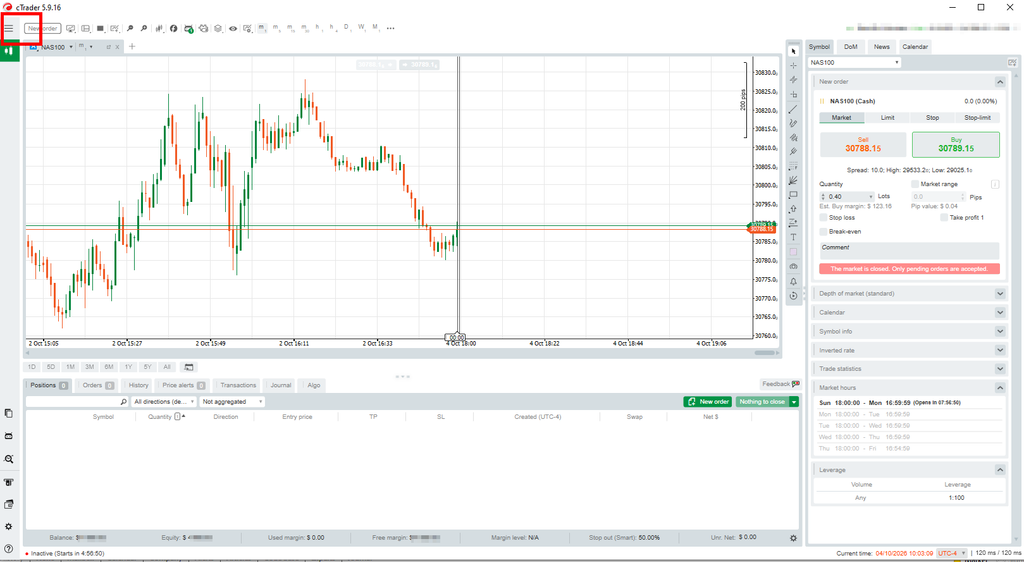
(b) Once the sidebar opens, click on the “Algo” tab.
(c) You should see the Copiix module already registered inside the Algo menu.
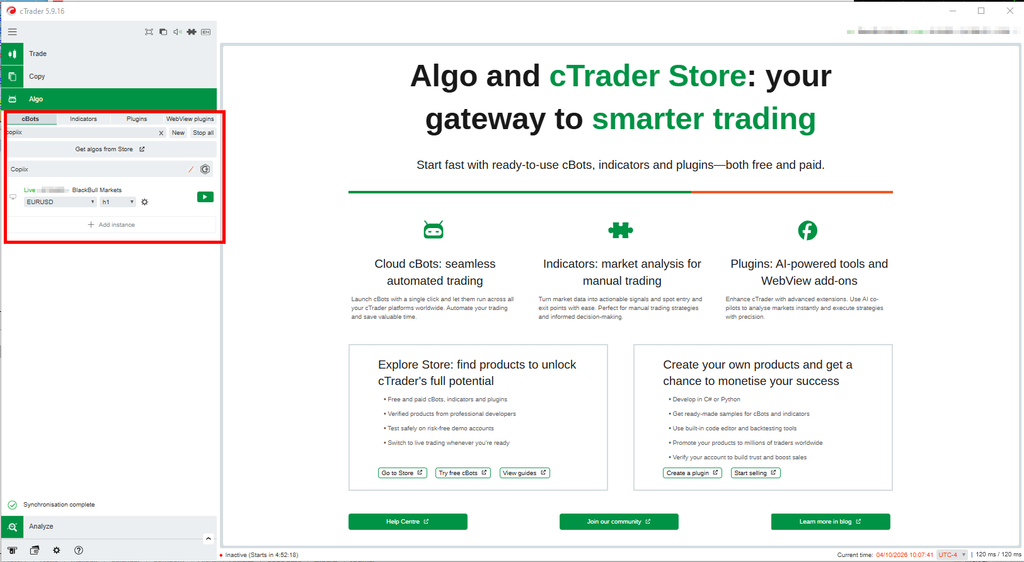
* If the Copiix module doesn’t appear, return to the Copiix console settings and click “Install Terminals” again.
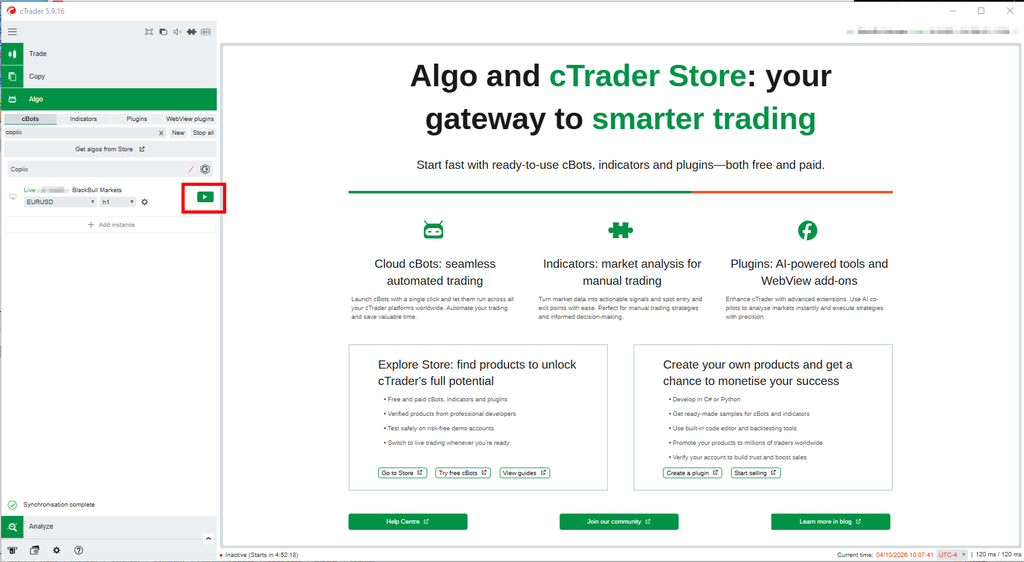
(d) Click the Play button to initialize the module.
(e) A permissions popup will appear. Click “Allow”.
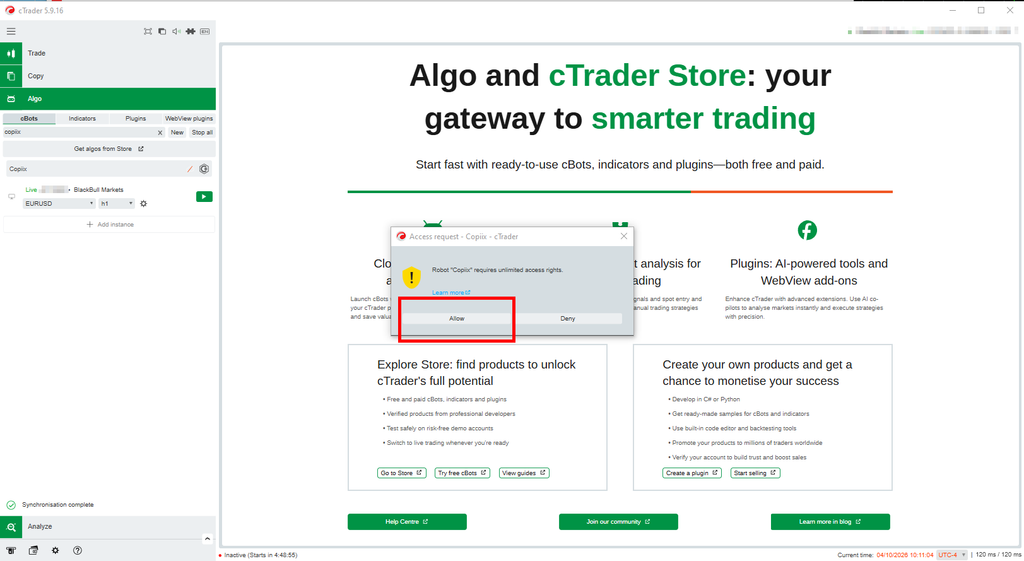
(f) The module status will update. When the Play icon switches to a Square (Stop) icon, it is running properly.
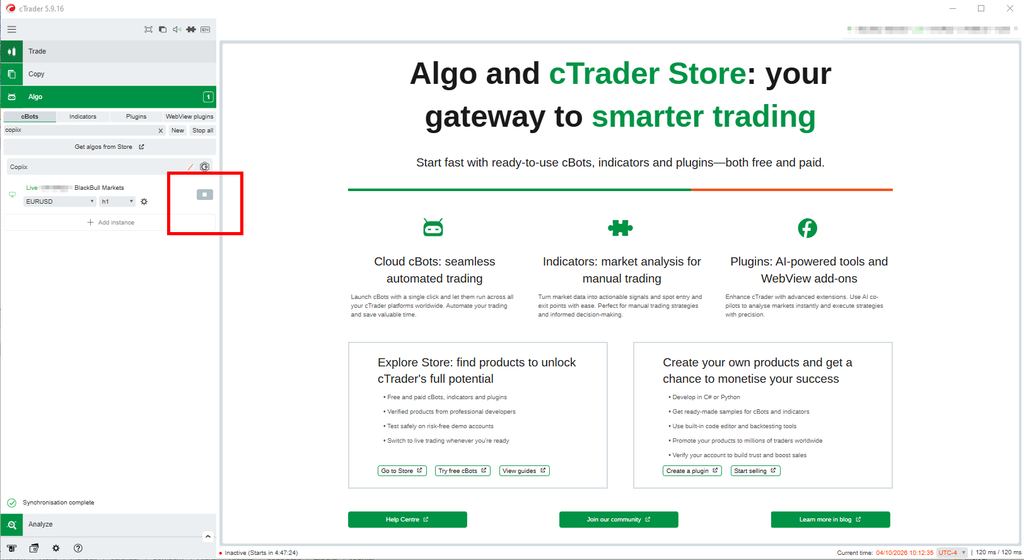
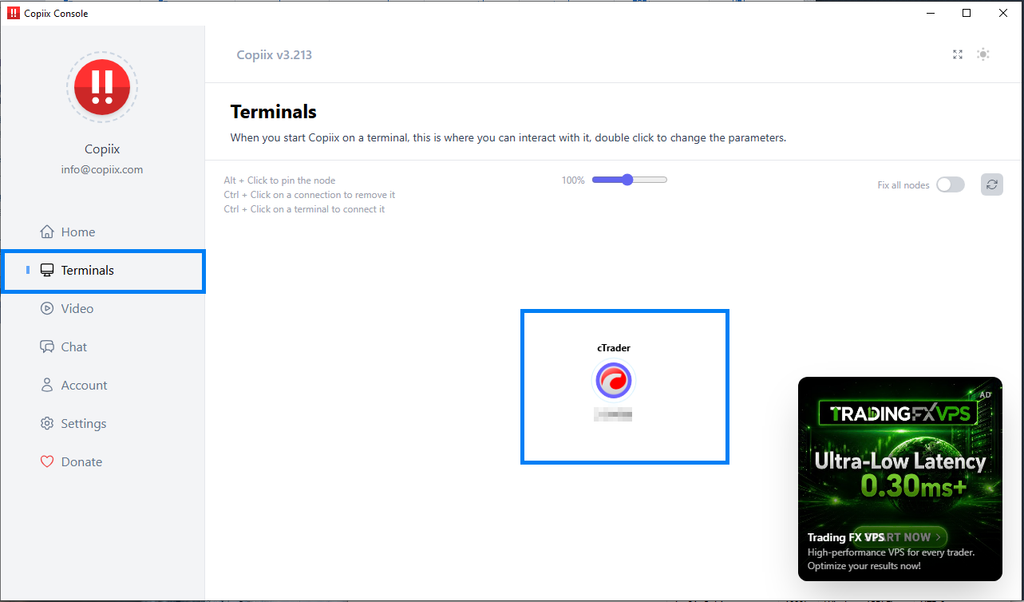
(g) Once activated, your terminal will appear under the “Terminals” section in the Copiix console. (Note: It may take several seconds to show up.)
(h) Launch two separate cTrader windows—one for your Provider (Master) and one for your Copyer (Slave)—and verify both accounts appear in the Copiix console’s Terminals tab:
- Open the Provider cTrader window (using BlackBull in this tutorial).

- Select your Provider account from the account dropdown in the top-right corner.
- Ensure the Copiix module is running in the left Algo tab (confirm the Play button turned into a square).
- Open the Copyer cTrader window (using FTMO in this tutorial).

- Select your Copyer account from the account dropdown in the top-right corner.
- Ensure the Copiix module is running in the left Algo tab here as well.
- Note: If you select your Copyer account and the chart area displays a blank screen with only a “Refresh” button, the symbol name differs between the Provider and Copyer. Selecting the appropriate symbol for the Copyer account will resolve the chart display.

(i) When both terminals appear in the Copiix console as shown below, the link is successful.
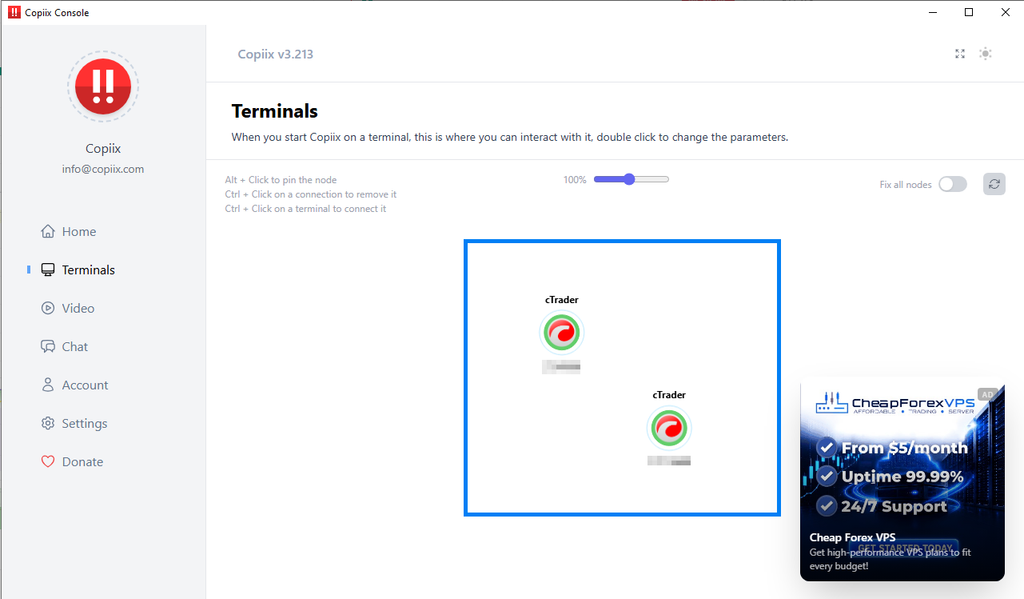
* Note: If your created accounts (BlackBull or FTMO) do not show up in the top-right account list, the account hasn’t been linked to your cTrader profile yet. You can link cTrader accounts inside each platform’s client dashboard.
Step 3: Configure the Provider in the Copiix Console
- Double-click the Provider account inside the Copiix console.(In my case, the top row represents the BlackBull Provider account. Double-check your account number before selecting.)

- Under the Provider section, toggle “Provider” to ON. In the Copyers List, enable the target account you want to route trade signals to. Then, click “Save” at the top.

Step 4: Configure the Copyer in the Copiix Console
- Double-click the Copyer account inside the Copiix console.(In my case, the bottom row is the FTMO Copyer account. Double-check your account number before proceeding.)

- Under the Copyer section, toggle “Copyer” to ON and click “Save”.

- Once configured, you will see a connecting line bridging both terminals on the dashboard.

Step 5: Lot Sizing & Symbol Mapping Configuration
You must map symbols and configure lot sizing rules according to your platform specs (e.g., BlackBull vs. FTMO) and respective account balances.
For example, if your Provider account balance is $5,000 and your Copyer account balance is $10,000, placing a 1.0 lot trade on the Provider should proportionally open a 2.0 lot trade on the Copyer.
Here is how to set up symbol translation and lot scaling:
1. Symbol Translation Setup
Set up symbol matching under “Translate Symbols” in the Copyer settings.
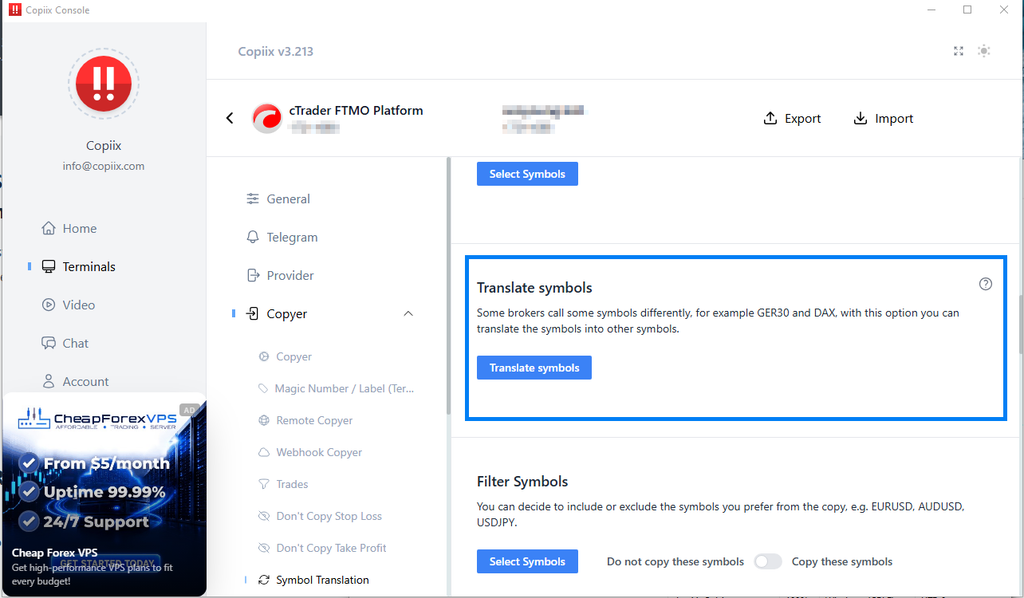
Click “Translate symbols”.
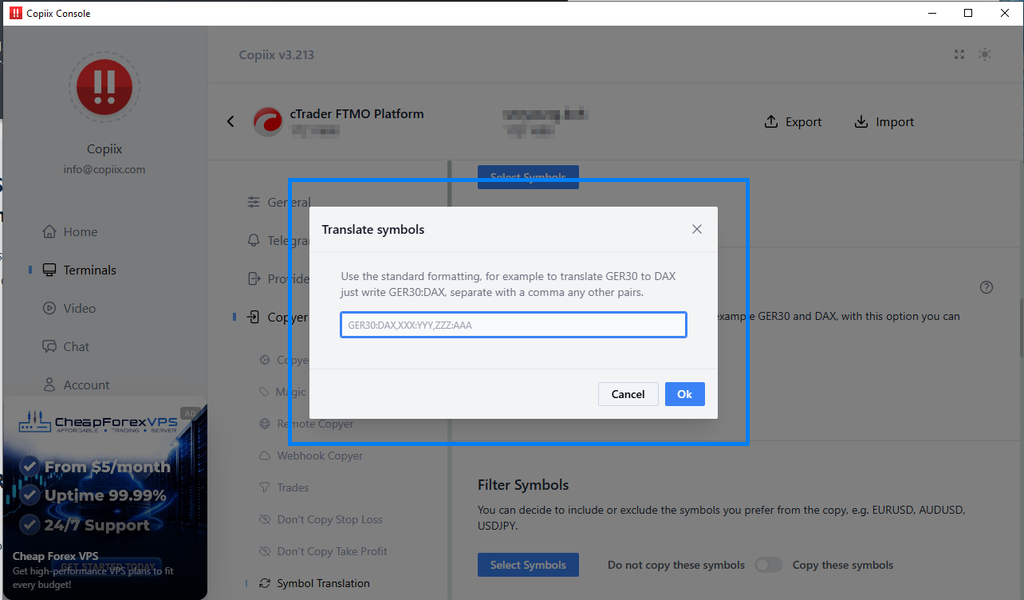
Map the symbols between BlackBull and FTMO. The left column represents the Provider symbol (BlackBull), and the right represents the Copyer symbol (FTMO). Adjust ticker names according to your broker’s naming conventions.
Click Save once finished.
2. Lot Sizing (Money Management) Setup
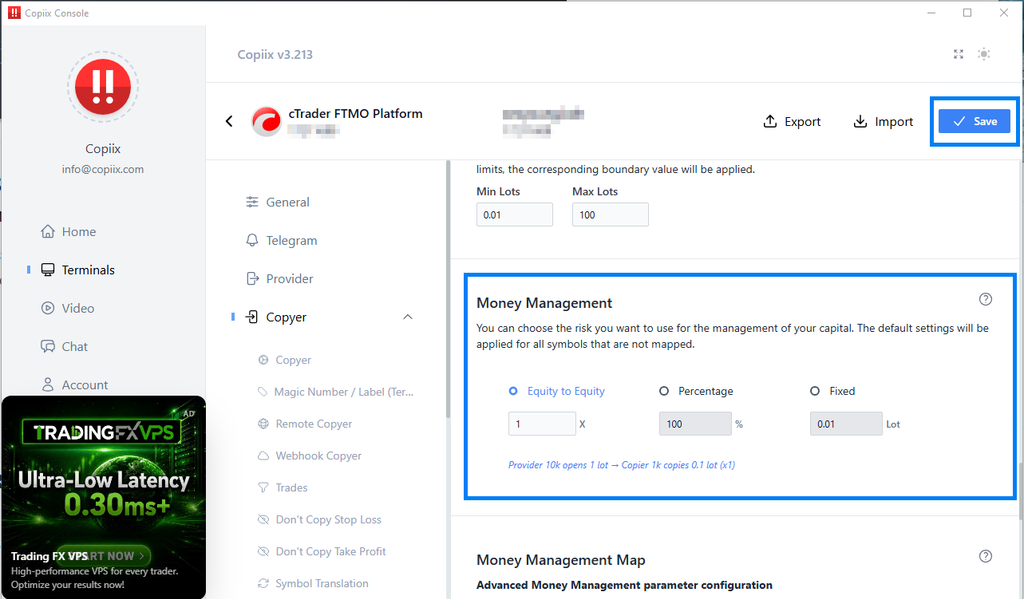
Configure position scaling under “Money Management” in the Copyer settings:
- Equity to Equity: Automatically scales lot sizes based on balance ratios (e.g., if Provider equity is $1,000 and Copyer equity is $100,000, lot size scales up proportionally).
- Percentage (Multiplier): Copies orders at a fixed multiple (e.g., 2x or 0.5x) of the Provider lot size.
- Fixed Lot: Executes a predetermined fixed lot size (e.g., 0.01 lots) on the Slave account regardless of Master trade size.
Select your preferred mode (I use Equity to Equity) and click Save.
Step 6: Executing Your First Test Trade
Open both cTrader windows side by side. You can simply launch cTrader twice to open two distinct instances—no complicated workarounds required. (Note: MT5 requires a slightly different multi-instance setup; refer to [Link] for that guide).
Place a small test order from the Provider account.
* Important Warning: Copiix works well for FTMO when trading Crypto, Forex, and Gold/Silver. However, do NOT use Copiix for Indices and Commodities on FTMO. FTMO appends a period to these asset tickers (e.g., US100.cash). Because Copiix’s symbol translation fails on symbols containing periods (.), you cannot reliably trade indices or commodities with Copiix on FTMO. For those instruments, consider cloud-based services like Duplikium or TradersConnect. While paid, they handle custom symbol formats reliably. I covered those in a separate post, so be sure to check that out.
4. [Must-Read] Essential Checklist to Avoid Instant Prop Firm Bans
Even if a prop firm permits copy trading between your own accounts, their risk engines run automated flag systems. Neglecting these configurations can lead to account termination upon requesting your first payout!
① Disable Order Comments
By default, copied orders may include tags like Copied by Copiix in the trade comment field. This is an immediate red flag for prop firm risk engines.
- Action: Enable Custom Comment inside Copiix mapping settings and leave it completely blank, or set a neutral string that mimics ordinary manual execution.
② Set Max Slippage & Execution Delays
During high-impact news releases, market volatility can cause delayed signals to execute at adverse prices.
- Max Slippage: Cap your slippage tolerance to 3–5 pips. If price deviation exceeds this threshold, skipping the entry entirely protects your prop firm drawdown buffer.
③ Name Matching (KYC Verification)
As stressed in the previous post, technical precision means nothing if the passport name on your Master account does not match the legal name on your prop firm account. Mismatched identities result in denied payouts and permanent bans. Prop firms frequently request trading logs, screenshots, or screen recordings of the master account to verify ownership during payout reviews. Only link accounts registered strictly under your own legal name.
5. Final Pre-Flight Checklist (Always Test First!)
Do not immediately trade full size on live challenge accounts right after setup!
- Open a 0.01 micro lot test position on any instrument from the Master account.
- Confirm the trade executes on the prop account within 0.1 seconds without visible latency.
- Modify Take Profit (TP) and Stop Loss (SL) levels on the Master, and verify changes mirror in real time on the Slave.
- Close the position on the Master and confirm the Slave closes immediately.
Once all four validation checks pass seamlessly, you’re ready to tackle the challenge.
Final Thoughts: One Pair of Hands, Multiple Accounts
No more juggling multiple monitors with aching wrists trying to execute split entries manually.
Focus 100% of your energy on finding clean, disciplined setups on your primary account. Copiix will quietly handle the replication and balance scaling in the background.
If you run into broker server connectivity issues or have questions about calculating lot ratios, leave a comment below. Trade safe and stay consistent!